Adding admins to your Project Zomboid server
There are two ways to make a player an admin: with a command in the server console, or by editing the server's player database.
Option 1: Use the server console
-
Join your server with the player you want to make an admin, so their account exists on the server.
-
Open the Fragnet dashboard, go to My servers and select your Project Zomboid server.
-
On the Overview tab, click in the Enter a command… field at the bottom of the Console card (see Send a command).
-
Type the following command, with the player's username, and press Enter:
setaccesslevel usernameOfPlayer adminIf the username has spaces, put it in quotes:
setaccesslevel "user name" admin.
The console confirms the change:

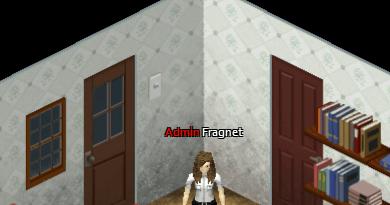
In the game, the player now has a red Admin tag next to their username.
To see the other console commands, type help.
Access levels
Instead of admin, you can give a player one of these access levels.
Observer
- Toggle god mode (on themselves only)
- Toggle invisible (on themselves only)
- See connected players (
/players) - Teleport to a player (can't teleport a player elsewhere)
- Toggle noclip (on themselves only)
- Teleport to coordinates
- See server options
- Open locked doors
- Go inside safehouses
- Can't be kicked for lag
- Can always join the server, even if it's full
- Can talk while invisible
- Sees invisible players
- Can't be hit by players
- Logs in invisible and invincible
- See player stats (name, skills, traits and more) by clicking a player and selecting Check Stats, but can't change them
GM
- Everything an Observer can do, plus:
- Toggle god mode (on themselves and others)
- Toggle invisible (on themselves and others)
- Toggle noclip (on themselves and others)
- Teleport a player to another player
- Use
/alarm,/gunshot,/thunderand/chopper - Start and stop rain
- Add items
- Add XP
Overseer
- Everything a GM can do, plus:
- Create a horde
- Kick users
- Display a server message
- See a player's connection info
- Disconnect a player by connection number (
/disconnect) - Use
/nightlengthmodifier - Change player stats in the player stats window
- Ban a player from
/allchat
Moderator
- Everything an Overseer can do, plus:
- Ban and unban users (including by Steam ID)
- Manage the whitelist (
/adduser,/addusertowhitelist,/addalltowhitelist,/removeuserfromwhitelist) - Change access levels (but can't set admin)
- Set up safehouses
Admin
- Everything a Moderator can do, plus:
- Save the world
- Quit the world
- Change access levels (including admin)
- Reload server options
- Change server options
- Send a pulse
- Reload Lua files
- Bypass the Lua checksum
Option 2: Edit the PZServer.db database
The server keeps its player accounts in a database file, PZServer.db, in the pzserver/db folder. This is a binary file, so you download it, edit it on your computer and upload it again.
-
Open the Fragnet dashboard, go to My servers and select your Project Zomboid server.
-
Stop the server with Shut down. The server writes to the database while it runs.
-
Open the Files tab and go to the
pzserver/dbfolder. -
Open the ⋯ menu of
PZServer.dband select Download. -
Download SQLite Admin, a program for editing SQLite database files, and open
PZServer.dbwith it. -
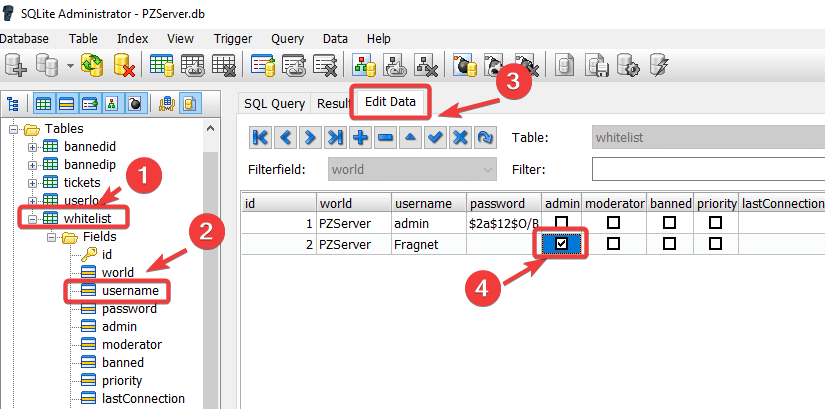
Under Tables, select whitelist, expand it and select a field, for example id.
-
Open the Edit Data tab. Tick the admin box next to each player who should be an admin.
-
Close the database. Your changes are saved automatically.
-
In the dashboard, go back to the
pzserver/dbfolder in the Files tab and upload the editedPZServer.dbwith Upload, or drag it onto the file list. It replaces the file on the server. See Upload files. -
Start the server with Start. The players now have admin rights.
The database is named after the Server Config Name startup setting, which is PZServer by default. If you changed that setting, look for the file with your name instead.