Creating a whitelist for your Project Zomboid server
A whitelist makes your server private: only players with an account on the server can join, using their username and password. You turn off public access, then add an account for each player.
Step 1: Turn off public access
- Open the Fragnet dashboard, go to My servers and select your Project Zomboid server.
- Open the Configuration tab and select General in the list on the left.
- In the Startup group, turn off Public access.
- Select Save in the bar at the bottom of the page.
- Restart the server: open ⋯ More actions at the top of the page and select Restart.
Now only players with an account can join. Players who already joined while the server was open have an account and can still join.
Step 2: Add players
With the server console
-
Make sure the server is running.
-
On the Overview tab, click in the Enter a command… field at the bottom of the Console card (see Send a command).
-
Type the following command, with the player's username and password, and press Enter:
adduser "username" "password" -
Give the player their username and password. They enter them when they join the server.
By editing the PZServer.db database
The server keeps its player accounts in PZServer.db in the pzserver/db folder. This is a binary file, so you download it, edit it on your computer and upload it again.
-
Stop the server with Shut down. The server writes to the database while it runs.
-
Open the Files tab and go to the
pzserver/dbfolder. -
Open the ⋯ menu of
PZServer.dband select Download. -
Download SQLite Admin, a program for editing SQLite database files, and open
PZServer.dbwith it. -
Under Tables, select whitelist, expand it and select a field, for example id.
-
Open the Edit Data tab. To add a player, select the + button, then enter
PZServerin the world column and the player's username and password in the username and password columns.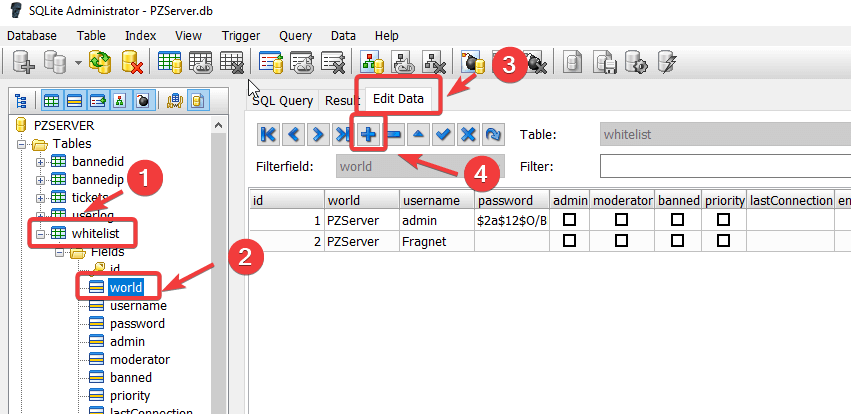
-
Close the database. Your changes are saved automatically.
-
In the dashboard, go back to the
pzserver/dbfolder in the Files tab and upload the editedPZServer.dbwith Upload, or drag it onto the file list. It replaces the file on the server. See Upload files. -
Start the server with Start.
The database file and the world value are named after the Server Config Name startup setting, which is PZServer by default. If you changed that setting, use your name instead.